How to Put Blackout Curtains Over Blinds
Maximizing light control and enhancing privacy in a room often necessitates a dual approach. Combining blinds, which offer adjustable light filtering, with blackout curtains, known for their near-complete light blocking capabilities, is a common solution. This combination provides versatility, allowing for diffused light when desired and complete darkness when needed. The process of installing blackout curtains over blinds is relatively straightforward, but careful planning and execution are essential to ensure a secure and aesthetically pleasing result. This article details the various methods, considerations, and steps involved in successfully layering blackout curtains over existing blinds.
Before commencing the installation, it is crucial to assess the current window setup. This includes determining the type of blinds installed (e.g., Venetian, vertical, mini-blinds) and the available space above the window frame. The choice of blackout curtains should complement the existing decor and the blinds themselves. Furthermore, accurate measurements of the window and blinds are critical for selecting appropriately sized curtains and hardware. Proper planning minimizes errors and ensures a professional-looking finished installation.
Key Point 1: Assessing Your Windows and Choosing the Right Curtains
The effectiveness of layering blackout curtains over blinds hinges on careful assessment and appropriate selection. The existing window setup plays a significant role in the choice of blackout curtains and the installation methods employed. Consideration must be given to several factors, including the type of blinds installed, the window frame dimensions, and the overall aesthetic of the room.
Different types of blinds necessitate different approaches. Venetian blinds, with their horizontal slats, often require curtains that can easily slide past the headrail. Vertical blinds, on the other hand, may benefit from wider curtain panels to adequately cover the wider window expanse. Mini-blinds, being smaller and more compact, generally allow for greater flexibility in curtain choice. Understanding the specific characteristics of the existing blinds is fundamental to selecting compatible curtains.
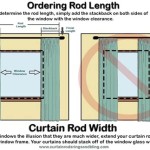
Accurate measurements are paramount. Measure the width and height of the window frame, including any existing trim. Add several inches to both the width and height to ensure that the blackout curtains completely cover the window and extend beyond the frame to minimize light leakage. The length of the curtain rod will also depend on the desired visual effect. A rod that extends several inches beyond the window frame on each side can make the window appear larger and further reduce light seepage around the edges of the curtains.
The choice of blackout curtain material and style should align with the room's existing decor. Blackout curtains are available in a variety of fabrics, colors, and patterns. Thicker, denser fabrics generally provide better light blocking capabilities. Some blackout curtains also feature thermal insulation properties, which can help regulate room temperature and reduce energy costs. It is important to select a style that complements the existing blinds and the overall aesthetic of the room. For example, heavier, more formal curtains may be appropriate for a bedroom, while lighter, more casual curtains may be suitable for a living room or home office.
Consider the mounting method as well. There are several ways to hang blackout curtains over blinds, including using a single rod, a double rod, or track systems. The choice of mounting method will depend on personal preference, the weight of the curtains, and the available space above the window frame. A single rod is the simplest and most common option, while a double rod allows for layering sheer curtains or decorative panels in addition to the blackout curtains. Track systems offer a sleek and modern look and can be particularly useful for large windows or sliding glass doors.
Key Point 2: Installation Methods and Hardware Options
Once the assessment and selection phases are complete, the next step involves choosing the appropriate installation method and gathering the necessary hardware. The installation method will largely depend on the chosen curtain style, the existing window setup, and personal preference. Common methods include using a single curtain rod, a double curtain rod, or a track system.
A single curtain rod is the most straightforward option. This involves installing a single rod above the window frame and hanging the blackout curtains directly on the rod. The rod can be mounted using brackets that are attached to the wall or window frame. It is crucial to use sturdy brackets that can support the weight of the curtains. The rod should be long enough to extend several inches beyond the window frame on each side to ensure complete coverage and minimize light leakage. When using a single rod, consider the ease of opening and closing the blinds. Ensure that the curtains do not obstruct the operation of the blinds and that there is sufficient space between the curtains and the blinds to allow for easy adjustment.
A double curtain rod offers greater flexibility and layering options. A double rod consists of two parallel rods, one mounted slightly in front of the other. This allows for hanging both blackout curtains and sheer curtains or decorative panels. The sheer curtains can provide diffused light and privacy during the day, while the blackout curtains can be drawn at night for complete darkness. Double rods typically require stronger brackets to support the added weight. Ensure that the brackets are securely mounted to the wall or window frame. When installing a double rod, consider the spacing between the two rods. There should be sufficient space to allow for easy movement of both the blackout curtains and the sheer curtains without them getting tangled or obstructing each other.
Track systems provide a sleek and modern alternative to traditional curtain rods. Track systems consist of a track that is mounted to the ceiling or wall and carriers that slide along the track, supporting the curtains. Track systems offer a smooth and effortless way to open and close curtains. They are particularly useful for large windows or sliding glass doors, where traditional curtain rods may not be practical. Track systems are available in a variety of styles and materials, including metal and plastic. When installing a track system, it is crucial to ensure that the track is securely mounted to the ceiling or wall. Use appropriate anchors and screws to support the weight of the curtains. The carriers should also be spaced evenly along the track to ensure that the curtains hang properly and move smoothly.
Regardless of the chosen installation method, it is essential to gather the necessary hardware before commencing the installation. This includes curtain rods or track systems, brackets, screws, anchors, a level, a measuring tape, a drill, and a screwdriver. It is also helpful to have a pencil for marking the location of the brackets or track. Before drilling any holes, double-check the measurements and ensure that the hardware is properly aligned. A level should be used to ensure that the curtain rod or track is installed straight and level. Failure to properly install the hardware can result in sagging curtains, uneven light blockage, and potential damage to the wall or window frame.
Key Point 3: Step-by-Step Installation and Troubleshooting
Once the necessary hardware and materials are assembled, the installation process can begin. The specific steps will vary depending on the chosen installation method, but the general principles remain the same. The process typically involves mounting the hardware, hanging the curtains, and making any necessary adjustments to ensure optimal light blockage and functionality.
For a single curtain rod installation, begin by marking the location of the brackets on the wall or window frame. Use a measuring tape and a level to ensure that the brackets are evenly spaced and aligned. The height of the brackets will depend on the desired length of the curtains. Generally, the brackets should be mounted several inches above the window frame to allow the curtains to extend beyond the frame and minimize light leakage. Once the brackets are marked, drill pilot holes and secure the brackets to the wall or window frame using screws and anchors. Ensure that the brackets are securely mounted and can support the weight of the curtains. Once the brackets are installed, slide the curtain rod through the curtain rings or tabs and place the rod onto the brackets. Adjust the position of the curtains to ensure that they are evenly distributed and hang properly.
For a double curtain rod installation, the process is similar to that of a single curtain rod, but with the added complexity of installing two parallel rods. The brackets for a double rod are typically designed to support both rods. Mark the location of the brackets on the wall or window frame, ensuring that they are evenly spaced and aligned. The spacing between the two rods should be sufficient to allow for easy movement of both the blackout curtains and the sheer curtains or decorative panels. Drill pilot holes and secure the brackets to the wall or window frame using screws and anchors. Once the brackets are installed, slide the curtain rods through the curtain rings or tabs and place the rods onto the brackets. Adjust the position of the curtains to ensure that they are evenly distributed and hang properly. Pay attention to the overlap between the blackout curtains and the sheer curtains or decorative panels to ensure optimal light control and privacy.
For a track system installation, the process involves mounting the track to the ceiling or wall and attaching the carriers to the track. Mark the location of the track on the ceiling or wall, ensuring that it is straight and level. Use a measuring tape and a level to ensure accurate placement. Drill pilot holes and secure the track to the ceiling or wall using screws and anchors. Ensure that the track is securely mounted and can support the weight of the curtains. Once the track is installed, attach the carriers to the track and hang the curtains from the carriers. The carriers should be spaced evenly along the track to ensure that the curtains hang properly and move smoothly. Adjust the position of the curtains to ensure that they are evenly distributed and provide adequate light blockage.
After the curtains are installed, it is essential to test their functionality and make any necessary adjustments. Check for light leakage around the edges of the curtains and along the top and bottom. If there is significant light leakage, consider adding additional layers of fabric or using light-blocking tape to seal the gaps. Ensure that the curtains can be easily opened and closed without obstruction. If the curtains are too long, consider hemming them to the desired length. If the curtains are too short, consider adding a valance or decorative trim to extend their length. Regularly inspect the hardware and ensure that it is securely mounted. Tighten any loose screws or anchors as needed. By following these steps and troubleshooting any issues that arise, it is possible to successfully install blackout curtains over blinds and achieve optimal light control and privacy.

Step By Guide How To Install Blackout Curtains Over Blinds Sleepout

Simple Ways To Hang Curtains Over Vertical Blinds 13 Steps

How To Hang Curtains Over Blinds The Easy Way

How To Put Curtains Over Blinds Spiffy Spools Now

How To Install Curtains Over Blinds Factory Direct

Simple Ways To Hang Curtains Over Vertical Blinds 13 Steps

How To Put Curtains Over Blinds Spiffy Spools Now

How To Hang Curtains Over Blinds The Easy Way

How To Hang Curtains Over Blinds That Stick Out Pro Tips

How To Hang Curtains Over Blinds The Easy Way