How To Make Pinch Pleated Curtains
Pinch pleated curtains, also known as French pleat curtains, offer a sophisticated and tailored look to any room. Their structured pleats create a formal and elegant feel, making them a popular choice for living rooms, dining rooms, and bedrooms alike. While purchasing pre-made pinch pleated curtains is an option, creating them yourself allows for complete customization of fabric, size, and pleat style, ultimately resulting in a unique and personalized window treatment. This article provides a comprehensive guide on how to make pinch pleated curtains, covering essential materials, preparation steps, and the detailed process of creating perfect pleats.
Before commencing the project, it is crucial to gather all necessary materials and tools. This preparation stage ensures a smooth and efficient workflow, minimizing delays and potential errors during the construction process. The required materials are listed below.
Materials:
- Fabric: Select a suitable fabric based on the desired aesthetic and functionality. Heavier fabrics, such as linen blends or upholstery fabrics, provide a more structured and formal look, while lighter fabrics, such as cotton or voile, offer a softer and more casual appearance. The amount of fabric needed will depend on the desired curtain length, width, and fullness. Typically, a fullness of at least 2x the window width is recommended for pinch pleats.
- Curtain Lining (optional): Lining provides added insulation, light control, and privacy. It also protects the face fabric from fading and adds body to the curtains. Choose a lining fabric that complements the face fabric in terms of weight and color.
- Pinch Pleat Tape: This specialized tape has pre-sewn pockets or loops that facilitate the creation of uniform pleats. Choose a tape with the desired pleat spacing and number of pleats per repeat.
- Buckram or Header Tape: This stiff interfacing is applied to the top of the curtain to provide structure and support for the pleats. It prevents the fabric from sagging and ensures that the pleats maintain their shape.
- Curtain Hooks: Select hooks that are compatible with the pinch pleat tape and your curtain rod. Ensure they are sturdy enough to support the weight of the curtains.
- Thread: Choose a high-quality thread that matches the color of the face fabric and lining.
Tools:
- Sewing Machine: A reliable sewing machine is essential for creating neat and durable seams.
- Scissors: Use sharp fabric scissors for accurate cutting.
- Measuring Tape: A flexible measuring tape is crucial for precise measurements.
- Pins: Straight pins are used to secure fabric layers together before sewing.
- Iron and Ironing Board: Ironing is essential for creating crisp edges and pleats.
- Seam Ripper: A seam ripper is helpful for correcting errors.
- Tailor's Chalk or Fabric Marker: Use a fabric marker to mark measurements and pleat positions.
- Ruler or Straight Edge: A ruler aids in drawing straight lines for hems and pleats.
Following the material gathering stage, accurate measurements are paramount. Incorrect measurements can lead to ill-fitting curtains and require costly alterations. All measurements should be double-checked before cutting any fabric.
Measuring for Pinch Pleated Curtains:
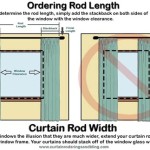
- Window Width: Measure the width of the window opening. Add several inches on each side to allow the curtains to extend beyond the window frame when open. This will prevent light leakage and create a more visually appealing effect.
- Desired Curtain Length: Measure from the top of the curtain rod to the desired bottom edge of the curtain. Consider whether you want the curtains to fall to the floor, puddle slightly, or end at the window sill. Account for the height of the curtain rings or hooks.
- Fullness: Determine the desired fullness for the curtains. A fullness of 2x the window width is generally recommended for pinch pleats. This means that the total width of the fabric should be twice as wide as the window opening. For example, if the window is 50 inches wide, the fabric width should be 100 inches. For a more luxurious look, consider a fullness of 2.5x or even 3x.
- Fabric Calculation: Calculate the total fabric required by multiplying the window width by the desired fullness. Add extra fabric for hems and seam allowances. For instance, if the window is 50 inches wide, you desire 2x fullness, and the desired curtain length is 84 inches, you will need 100 inches of fabric width and two pieces that are each 84 inches in length + seam allowances.
After taking measurements and gathering the necessary materials, the next stage involves preparing the fabric and lining. This includes cutting the fabric to the correct dimensions and applying necessary treatments, such as lining attachment.
Fabric and Lining Preparation:
- Cutting the Fabric: Use the measurements calculated to cut the face fabric and lining (if using) to the correct size. Be sure to add seam allowances to all edges. Typically, a 1-inch seam allowance is sufficient for the sides and bottom hem, while a 4-inch allowance is recommended for the top hem to accommodate the buckram and pinch pleat tape.
- Attaching the Lining (optional): If using a lining, place the face fabric and lining fabric right sides together. Pin along the sides and bottom edges. Sew along the pinned edges with a 1-inch seam allowance. Turn the fabric right side out and press the seams flat. Alternatively, you can treat the main fabric and lining seperately and attach with a simple top hem.
- Pressing: Press all fabric pieces thoroughly to remove any wrinkles or creases. This will ensure that the finished curtains have a smooth and professional appearance.
- Hemming the Sides: Fold over the side edges of the fabric by 1 inch and press. Fold over again by another 1 inch and press again. This creates a double-folded hem that is more durable and prevents fraying. Sew along the folded edge to secure the hem.
- Hemming the Bottom: Fold over the bottom edge of the fabric by 1 inch and press. Fold over again by another 2-3 inches (depending on the desired hem width) and press again. Sew along the folded edge to secure the hem. A wider hem adds weight to the bottom of the curtains and helps them hang straight.
Applying Buckram and Pinch Pleat Tape
Applying buckram and pinch pleat tape is a crucial step in creating pinch pleated curtains. The buckram provides support and structure to the top of the curtain, while the pinch pleat tape creates the uniform and elegant pleats that characterize this style of window treatment.
Applying Buckram:
- Cut the Buckram: Cut a strip of buckram to the width of the curtain panel. The height of the buckram should be approximately 4 inches, but this can be adjusted to suit your preference.
- Position the Buckram: Place the buckram on the wrong side of the fabric along the top edge. The buckram should be positioned so that it extends slightly beyond the top edge of the finished curtain.
- Attach the Buckram: Fold the top edge of the fabric over the buckram and press. Pin the folded edge in place. Sew along the top and bottom edges of the buckram to secure it to the fabric.
Applying Pinch Pleat Tape:
- Position the Tape: Place the pinch pleat tape on the wrong side of the fabric, aligning the top edge of the tape with the top edge of the buckram. The tape should be positioned so that the pockets or loops face downwards.
- Pin the Tape: Pin the tape in place along the top and bottom edges. Ensure that the tape is straight and evenly aligned.
- Sew the Tape: Sew along the top and bottom edges of the tape, close to the edges. Use a straight stitch and a matching thread color. Reinforce the stitching at the beginning and end of each seam.
- Securing the Sides: Fold the side edges of the pinch pleat tape inwards and stitch them down to prevent fraying.
Creating and Securing the Pinch Pleats
The process of creating and securing the pinch pleats involves carefully folding and manipulating the fabric to form the desired pleat shape. Accurate measurement and precise stitching are essential for achieving uniform and professional-looking pleats.
Creating the Pleats:
- Follow the Tape Instructions: Refer to the instructions provided with the pinch pleat tape for specific guidance on creating the pleats. Different types of pinch pleat tape may have slightly different methods for forming the pleats.
- Form the Pleats: Using the pockets or loops on the pinch pleat tape as a guide, pinch the fabric together to form the pleats. Each pleat should consist of three individual folds or fingers.
- Pin the Pleats: Secure each pleat in place with pins. Ensure that the pleats are evenly spaced and uniform in size. Adjust the pleats as necessary to achieve the desired look.
Securing the Pleats:
- Hand Stitching: Use a needle and thread to hand stitch the base of each pleat together. This will secure the pleats and prevent them from unraveling. Use a strong thread and a small, inconspicuous stitch.
- Machine Stitching (optional): For added durability, you can also machine stitch across the base of each pleat. Use a straight stitch and a matching thread color. Be sure to backstitch at the beginning and end of each seam.
- Removing the Pins: Once the pleats are securely stitched in place, remove the pins.
Attaching the Curtain Hooks and Hanging the Curtains
The final steps include attaching the curtain hooks to the back of the pinch pleats and hanging the curtains on the curtain rod. Proper installation is crucial for ensuring that the curtains hang correctly and function smoothly.
Attaching the Curtain Hooks:
- Insert the Hooks: Insert the curtain hooks into the pockets or loops on the pinch pleat tape. The hooks should be evenly spaced across the width of the curtain panel.
- Adjust Hook Placement: Adjust the placement of the hooks to ensure that the curtains hang at the desired height. The hooks should be positioned so that the bottom edge of the curtains is at the correct distance from the floor.
Hanging the Curtains:
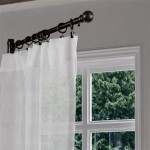
- Attach to the Rod: Hang the curtains on the curtain rod by inserting the hooks into the rings or carriers on the rod.
- Adjust the Pleats: Adjust the pleats as necessary to ensure that they hang evenly and uniformly.
- Dress the Curtains: "Dress" the curtains by gently arranging the folds and pleats. This involves smoothing out any wrinkles and ensuring that the curtains hang in a graceful and elegant manner.
Creating pinch pleated curtains requires patience, precision, and attention to detail. By following these steps carefully, you can create beautiful and custom window treatments that will enhance the aesthetic appeal of any room. Regular maintenance, such as vacuuming or gentle spot cleaning, will help to keep your pinch pleated curtains looking their best for years to come.

How To Diy Pinch Pleat Drapes No Sew Method Stefana Silber

Diy Pinch Pleat Curtains Fletcher Creek Cottage

How To Make Perfect Pinch Pleat Curtains With A Return The Stonybrook House

Pinch Pleating Curtains The Easy Way Lantern Lane Designs

Diy Pinch Pleat Curtains Youtube

How To Make Diy Pinch Pleat Curtains Quick And Easy 2025

Diy Pinch Pleat Curtains Fletcher Creek Cottage

How To Make Pinch Pleat Curtains Tidbits By Cami

How To Make Lined Double Pinch Pleated Curtains Pro Workroom Way

Diy Pinch Pleat Curtains Erin Zubot Design