How To Make A Curtain Room Divider
A curtain room divider presents a cost-effective and aesthetically versatile solution for partitioning spaces within a home or office environment. This method offers numerous advantages, including ease of installation, customization options, and the ability to reconfigure spaces quickly as needs evolve. Creating a curtain room divider involves several key steps, from planning and material selection to installation and final adjustments. The following provides a comprehensive guide to constructing a functional and visually appealing curtain room divider.
Planning and Design
The initial phase of creating a curtain room divider centers on meticulous planning and design considerations. This stage sets the foundation for a successful and satisfactory outcome. Accurate measurements, a clear understanding of the desired aesthetic, and a thoughtful approach to functionality are paramount.
The first step involves measuring the space where the curtain divider will be installed. This includes determining the width and height of the opening or area to be divided. Accurate measurements are critical for selecting the appropriate curtain rod length and fabric dimensions. Measure the width at both the top and bottom of the space, as walls are not always perfectly parallel. Measure from floor to ceiling at multiple points to account for any variations in height. Record these measurements carefully.
Next, the intended function of the room divider should be clearly defined. Consider the level of privacy required. Will the divider primarily serve as a visual barrier, or is it intended to provide sound dampening or block light? The function directly influences the choice of fabric. For instance, a lightweight, sheer fabric is suitable for visual separation, while a thicker, heavier material is preferable for greater privacy and sound absorption.
The aesthetic design of the curtain divider should complement the existing décor of the room. Consider the color scheme, style, and overall ambiance. Fabric choices should align with these elements. Options range from solid colors and subtle patterns to bold prints and textured materials. Gather samples of different fabrics and hold them up in the space to visualize how they will appear under varying lighting conditions. Consider how the fabric drapes and falls, as this contributes significantly to the overall look.
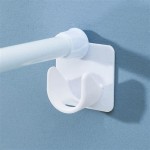
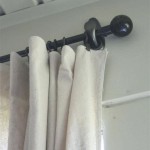
The choice of curtain rod system is crucial for both functionality and aesthetics. Several options exist, including standard curtain rods, tension rods, track systems, and even repurposed materials such as pipes. Standard curtain rods are suitable for most applications and offer a wide range of styles and finishes. Tension rods are ideal for temporary installations or spaces where drilling into walls is not feasible. Track systems provide a more professional and streamlined appearance, allowing curtains to glide smoothly and effortlessly. Consider the weight capacity of the rod system based on the chosen fabric. Ensure the rod system is sturdy and securely mounted to prevent sagging or falling.
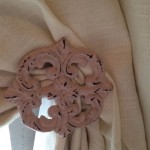
Hardware components, such as curtain rings, hooks, or grommets, should also be selected carefully. These elements affect the way the curtains hang and move along the rod. Rings and hooks are available in various styles and materials, offering different levels of sophistication. Grommets provide a clean, modern look and allow the curtains to hang in neat folds. Choose hardware that complements the chosen fabric and rod system. The number of rings, hooks, or grommets needed will depend on the width of the curtain panel and the desired fullness. A general guideline is to space them every 4-6 inches.
Material Selection and Preparation
Selecting the appropriate materials is essential for creating a durable and visually appealing curtain room divider. The choice of fabric significantly impacts the overall look, feel, and functionality of the divider. Careful consideration should be given to factors such as weight, texture, color, and care requirements. Once the fabric is chosen, it needs to be properly prepared before cutting and sewing.
The fabric weight influences the drape and privacy level of the curtain. Lightweight fabrics, such as voile or sheer linen, allow light to filter through and create a soft, airy feel. Medium-weight fabrics, such as cotton or linen blends, provide a balance of privacy and light diffusion. Heavyweight fabrics, such as velvet or blackout materials, offer maximum privacy and light blocking capabilities. The weight of the fabric also affects the load on the curtain rod; heavier fabrics require a sturdier rod system.
The texture of the fabric adds visual interest and tactile appeal to the room divider. Smooth fabrics, such as satin or silk, create a formal and elegant look. Textured fabrics, such as burlap or linen, add a rustic or casual touch. Consider how the texture interacts with the light in the room. Textured fabrics can create interesting shadows and highlights, adding depth and dimension to the space.
The color of the fabric should complement the existing décor of the room. Neutral colors, such as white, gray, or beige, are versatile and can easily blend with a variety of styles. Bold colors can add a pop of personality and create a focal point in the room. Consider the psychological impact of different colors. Cool colors, such as blue and green, tend to create a calming and relaxing atmosphere, while warm colors, such as red and yellow, can energize and stimulate the space.
Before cutting the fabric, it’s crucial to pre-wash it to prevent shrinkage after the curtain is made. Follow the manufacturer's washing instructions carefully. If the fabric is dry-clean only, take it to a professional cleaner before proceeding. Pre-washing also helps to remove any sizing or finishes that may affect the drape of the fabric. Once the fabric is washed and dried, iron it thoroughly to remove any wrinkles. This will ensure accurate cutting and sewing.
After ironing, lay the fabric flat on a large, clean surface, such as a cutting table or the floor. Use a measuring tape and a straight edge to mark the cutting lines. Add extra length to the top and bottom of the fabric for hemming and creating a rod pocket or attaching hardware. A general guideline is to add 4-6 inches to the top and 4-6 inches to the bottom. Use fabric scissors or a rotary cutter to cut the fabric along the marked lines. Ensure the cuts are straight and even.
Installation and Finishing Touches
The final stage involves installing the curtain rod and hanging the curtains. Proper installation ensures that the curtain divider functions smoothly and looks aesthetically pleasing. Attention to detail during this phase is crucial for achieving a professional and polished result. After the installation, adding finishing touches enhances the overall functionality and appearance of the divider.
Begin by mounting the curtain rod brackets to the wall or ceiling. Use a level to ensure the brackets are aligned horizontally. The placement of the brackets will depend on the desired height of the curtain and the type of rod system. For standard curtain rods, position the brackets so that the rod extends several inches beyond the width of the opening. This allows the curtains to fully clear the space when opened. For track systems, follow the manufacturer's instructions for mounting the track. Use appropriate hardware for the wall material, such as drywall anchors or wood screws. Ensure the brackets are securely fastened to prevent the rod from falling. If using a tension rod, extend it to the desired length and position it securely between the walls. Test the rod's stability before hanging the curtains.
Once the curtain rod is installed, hang the curtains using the chosen hardware. Thread the curtain rings or hooks through the rod and attach them to the top of the curtain panel. If using grommets, simply slide the rod through the grommets. Ensure the curtains are evenly distributed along the rod. Adjust the spacing of the rings or hooks to create a uniform drape. For track systems, attach the curtain carriers to the top of the curtain panel and slide them into the track.
After hanging the curtains, check the length and make any necessary adjustments. If the curtains are too long, hem the bottom to the desired length. Use a sewing machine or hand-sew the hem. For a clean and professional look, use a blind stitch or a rolled hem. If the curtains are too short, consider adding a decorative trim or border to the bottom to increase the length.
Consider adding tiebacks to hold the curtains open when desired. Tiebacks can be made from fabric, rope, or decorative cords. Attach the tiebacks to the wall at the desired height using hooks or brackets. Position the tiebacks so that they hold the curtains neatly and gracefully. Alternatively, consider using magnetic tiebacks, which are easy to use and do not require any hardware.
To enhance the functionality of the curtain divider, consider adding additional features such as soundproofing or light-blocking liners. Soundproofing liners can be attached to the back of the curtain panel to reduce noise transmission. Light-blocking liners can be used to darken the space and provide greater privacy. These liners can be purchased separately and easily attached to the curtain panel using clips or Velcro.
Finally, step back and assess the overall look and functionality of the curtain room divider. Make any necessary adjustments to ensure the curtains hang evenly and drape properly. Steam or iron the curtains to remove any wrinkles. The curtain room divider should be visually appealing, functional, and effectively divide the space according to the intended purpose.

How To Make A Chic Room Divider With Curtains City Decor

Clever Diy Room Divider Ideas Ohmeohmy Blog

Diy Room Divider For Under 100

10 Creative And Beautiful Diy Room Dividers Ideas

Small Space Ideas To Steal 7 Clever Twists On Room Dividers Remodelista

Shared Room Divider Curtain The Diy Vibe

Little Miss Kim S Class Diy Easy Classroom Divider With Pvc Pipe

Big Diy Linen Projects And Room Dividers Where To Find The Extra Wide Make Them Improvised Life

Genius Room Divider Idea Create A Private Space In Minutes

Little Miss Kim S Class Diy Easy Classroom Divider With Pvc Pipe