How to Hang Pleated Curtains with Rings: A Comprehensive Guide
Pleated curtains offer a sophisticated and tailored aesthetic to window treatments. Their structured folds, created by various pleating styles, add dimension and elegance to any room. However, properly hanging them, especially using rings, is crucial to achieve the desired look and ensure smooth operation. This article provides a detailed guide on how to hang pleated curtains with rings, covering necessary materials, installation techniques, and troubleshooting common issues.
Before commencing, it is essential to understand the different types of pleats commonly found in curtains. Pinch pleats, for instance, are a popular choice, characterized by their tightly gathered and stitched folds at the top, creating a fuller appearance. Goblet pleats, resembling an inverted wine glass, offer a more formal and voluminous effect. Pencil pleats feature evenly spaced, slender folds, providing a more streamlined and contemporary look. The chosen pleat style will influence the selection and placement of curtain rings.
The choice of rings also plays a significant role in the overall aesthetic and functionality of the curtains. Rings come in various materials, including metal, plastic, and wood, each offering different levels of durability and visual appeal. Metal rings, especially those made of brass or stainless steel, are known for their sturdiness and resistance to rust. Plastic rings are a more budget-friendly option but may be less durable over time. Wooden rings add a touch of natural warmth and can complement rustic or traditional decor. The diameter of the rings should be appropriate for the curtain rod to ensure smooth gliding.
Key Point 1: Gathering Necessary Materials and Tools
The initial step involves gathering all the necessary materials and tools for a successful installation. This ensures a seamless and efficient process, minimizing interruptions and potential frustrations. The following items are typically required:
Pleated Curtains: Ensure the curtains are the correct size and length for the window. Measure the window accurately and consider the desired amount of overlap and puddle (extra fabric at the bottom). Thoroughly inspect the curtains for any defects or damages before proceeding.
Curtain Rings: Choose rings that are compatible with the curtain's pleat style and the curtain rod's diameter. The number of rings required depends on the width of the curtains and the desired fullness. A general guideline is to use one ring per pleat, plus one or two additional rings at each end for stability.
Curtain Rod and Mounting Hardware: Select a curtain rod that is sturdy enough to support the weight of the curtains. The rod should extend beyond the window frame on both sides to allow the curtains to be fully opened. Ensure the mounting hardware, including brackets, screws, and anchors, is appropriate for the wall material (drywall, plaster, or wood).
Measuring Tape: A measuring tape is indispensable for accurate measurements of the window, curtain rod, and curtain placement. Precision is crucial for achieving a professional and balanced look.
Pencil: A pencil is used for marking the desired locations for the curtain rod brackets and ring placement. Use a light touch to avoid damaging the walls or curtains.
Drill with Appropriate Drill Bits: A drill is necessary for creating pilot holes for the screws that secure the curtain rod brackets to the wall. Use a drill bit that is slightly smaller than the screw size to ensure a secure fit.
Screwdriver: A screwdriver is used for tightening the screws that hold the curtain rod brackets and rings in place. Choose a screwdriver with a comfortable grip and appropriate size for the screws.
Level: A level is essential for ensuring that the curtain rod is installed horizontally. This prevents the curtains from hanging unevenly and creates a more aesthetically pleasing appearance.
Ladder or Step Stool: A ladder or step stool is necessary for reaching the desired height for installing the curtain rod and hanging the curtains. Ensure the ladder or step stool is stable and secure before use.
Safety Glasses: Safety glasses are recommended to protect the eyes from dust and debris while drilling.
Key Point 2: Installing the Curtain Rod and Attaching the Rings
Once all the necessary materials and tools are gathered, the next step is to install the curtain rod and attach the rings to the curtains. This process requires careful attention to detail to ensure proper alignment and functionality.
Determine the Placement of the Curtain Rod: The height of the curtain rod should be determined based on the desired effect and the window's proportions. Generally, the rod should be installed 4-6 inches above the window frame to create the illusion of a taller window. The rod should also extend beyond the window frame on both sides, typically by 6-12 inches, to allow the curtains to be fully opened without blocking the window.
Mark the Bracket Locations: Use a measuring tape and pencil to mark the desired locations for the curtain rod brackets on the wall. Ensure the marks are level using a level. For wider windows, a center bracket may be necessary to provide additional support.
Install the Curtain Rod Brackets: Use a drill to create pilot holes at the marked locations. Insert wall anchors if necessary, especially if the wall is made of drywall or plaster. Secure the curtain rod brackets to the wall using screws. Ensure the brackets are securely attached and can support the weight of the curtain rod and curtains.
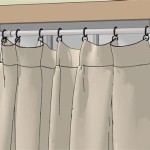
Attach the Rings to the Curtains: The method for attaching the rings depends on the type of pleats and the design of the rings. For curtains with pin hooks, insert the hooks into the designated loops or pockets on the back of the curtain heading, then attach the rings to the hooks. For curtains without pin hooks, sew or clip the rings directly to the back of the curtain heading, spacing them evenly according to the pleat style. Ensure the rings are securely attached to prevent them from falling off.
Thread the Curtain Rod Through the Rings: Carefully thread the curtain rod through the rings, starting from one end and working towards the other. Ensure the rings are evenly distributed along the rod to prevent the curtains from bunching up in certain areas. Add end caps or finials to the curtain rod to prevent the rings from sliding off.
Key Point 3: Hanging the Curtains and Making Adjustments
The final step involves hanging the curtains on the installed rod and making any necessary adjustments to ensure a perfect fit and appearance. This may involve adjusting the ring placement, hemming the curtains, or adjusting the pleat fullness.
Hang the Curtains on the Curtain Rod Brackets: Carefully lift the curtain rod and place it onto the installed brackets. Ensure the rod is securely seated in the brackets and will not fall off. Adjust the position of the curtains on the rod to ensure they are evenly distributed and cover the desired area.
Adjust the Ring Placement: If the curtains are not hanging evenly or the pleats are not properly aligned, adjust the placement of the rings along the rod. Try moving the rings closer together or further apart to achieve the desired fullness and drape. Pay attention to the end rings, ensuring they are positioned to prevent the curtains from sagging at the edges.
Hem the Curtains if Necessary: If the curtains are too long, they may need to be hemmed to the correct length. This can be done by hand or with a sewing machine. Ensure the hem is even and the stitching is neat. Alternatively, consider using hemming tape for a quick and easy, no-sew solution. However, be aware that hemming tape may not be as durable as traditional stitching.
Adjust the Pleat Fullness: The fullness of the pleats can be adjusted by manipulating the fabric and rings. For pinch pleats, gently pinch and shape the pleats to achieve the desired definition. For goblet pleats, ensure the "goblets" are evenly spaced and maintain their shape. For pencil pleats, adjust the drawstrings at the back of the curtain to control the fullness.
Steam or Iron the Curtains: After hanging, the curtains may have wrinkles or creases from packaging or storage. Use a steamer or iron to remove these imperfections and create a smooth, polished look. Follow the manufacturer's instructions for care and maintenance to avoid damaging the fabric.
Troubleshooting Common Issues: Several issues may arise during the installation process. If the curtain rod is sagging, consider adding a center bracket for additional support. If the curtains are difficult to slide along the rod, lubricate the rings with a silicone-based spray. If the pleats are not holding their shape, consider using pleat keepers or weights to add structure and stability.
By following these detailed instructions, individuals can successfully hang pleated curtains with rings, enhancing the aesthetic appeal and functionality of their window treatments. Careful planning, accurate measurements, and attention to detail are key to achieving a professional and lasting result.

How To Hang Curtains On Rings With Perfect Results The Homes I Have Made

How To Pleat Curtains For A Custom Look

How To Hang Pleated Draperies

Curtain Clips What S The Best Way To Hang Your Drapery

How To Hang Curtains On Rings With Perfect Results The Homes I Have Made

How Do Drapery Rings Work Tips From A Workroom

How To Hang Pencil Pleat Curtains With Pictures

How To Hang Curtains Easy Follow Detailed Guide On Your Like A Pro

How To Make Diy Pinch Pleat Curtains Quick And Easy 2025

Diy Pinch Pleat Curtains Erin Zubot Design