```html
Easy To Install Blackout Curtains: A Comprehensive Guide
Blackout curtains represent a practical solution for managing light and enhancing privacy within a residential or commercial space. Their primary function involves blocking external light, creating a darkened environment conducive to sleep, improved media viewing, and energy conservation. The installation process, often perceived as daunting, can be simplified significantly with appropriate preparation and a clear understanding of the necessary steps. This article provides a detailed guide to installing blackout curtains with ease.
The demand for blackout curtains stems from various needs. Individuals sensitive to light during sleep, shift workers requiring daytime rest, and those seeking to reduce glare on electronic screens are common users. Furthermore, blackout curtains can contribute to energy efficiency by insulating windows, preventing heat loss in the winter and minimizing heat gain in the summer. This results in reduced energy consumption and lower utility bills.
Before commencing the installation, accurate measurements are crucial. Determine the desired width and length of the curtains, considering factors such as the window frame's dimensions, the desired overlap on each side, and the preferred length to cover the window completely or extend to the floor. A steel measuring tape provides the most accurate results. Document these measurements precisely to ensure the correct size of curtains and hardware is purchased.
Selecting the appropriate hardware is equally important. Curtain rods specifically designed for heavier fabrics, such as those used in blackout curtains, are recommended. These rods typically feature sturdier brackets and thicker diameters to prevent sagging or bending under the weight of the curtains. Consider the style and finish of the rod to complement the room's décor. Options include single rods, double rods (for layering with sheer curtains), and traverse rods with a pull cord mechanism. The mounting hardware (screws, anchors) must be suitable for the wall material (drywall, plaster, concrete) to ensure secure installation.
Key Point 1: Preparing for Blackout Curtain Installation
Preparation is the cornerstone of a successful installation. This phase involves gathering the necessary tools and materials, as well as preparing the window area. The following steps are essential:
1. Assembling Tools and Materials: A standard toolkit should include a drill with appropriate drill bits, a screwdriver (both Phillips and flathead), a measuring tape, a level, a pencil, and potentially a stud finder to locate wall studs for enhanced support. The blackout curtains themselves, along with the chosen curtain rod, brackets, and mounting hardware, must be readily available. Consider having a step ladder or sturdy chair for reaching higher window areas.
2. Preparing the Window Area: Remove any existing window treatments, such as blinds or curtains. Clean the window frame and surrounding wall area to remove dust, dirt, or debris. This ensures a clean surface for the mounting hardware and prevents any interference with the curtain's movement. Inspect the wall for any cracks or damage that may compromise the stability of the installation. Repair any minor imperfections before proceeding.
3. Determining Mounting Location: Carefully consider the desired height and width of the curtain rod. As a general guideline, the rod should be positioned approximately 4-6 inches above the window frame to create a sense of height and allow for optimal light blockage. Extend the rod a similar distance beyond the sides of the window frame to minimize light gaps. Use a level to ensure the rod is perfectly horizontal. Mark the mounting locations for the brackets with a pencil.
4. Safety Precautions: Always wear appropriate safety glasses to protect your eyes from dust and debris during drilling. Be mindful of electrical wiring within the walls to prevent accidental drilling into live wires. If unsure, consult a qualified electrician. Ensure the step ladder or chair is stable and secure before climbing. Consider having a second person assist with holding the curtain rod or providing support during installation.
Key Point 2: Installing the Curtain Rod and Brackets
The installation of the curtain rod and brackets forms the foundation for hanging the blackout curtains. Accuracy and precision are paramount to ensure a secure and aesthetically pleasing result. The following steps outline the process:
1. Drilling Pilot Holes: Using the pencil markings as a guide, drill pilot holes into the wall at the designated bracket locations. The size of the drill bit should correspond to the size of the screws being used. For drywall, consider using self-drilling drywall anchors to provide additional support. For plaster or concrete walls, use appropriate masonry drill bits and anchors. If possible, locate wall studs and drill directly into them for maximum stability.
2. Attaching the Brackets: Position the brackets over the pilot holes and secure them to the wall using the appropriate screws. Ensure the brackets are level and firmly attached. Over-tightening the screws can strip the threads or damage the wall, so exercise caution. If using drywall anchors, ensure they are properly inserted and expand to provide a secure hold. If using multiple brackets, distribute them evenly along the length of the rod to provide adequate support.
3. Inserting the Curtain Rod: Once the brackets are securely mounted, carefully insert the curtain rod through the brackets. Ensure the rod is centered and properly seated within the brackets. Tighten any set screws or locking mechanisms to secure the rod in place. If using a double rod, install the sheer curtain rod first, followed by the blackout curtain rod.
4. Testing Stability: Before hanging the curtains, gently test the stability of the curtain rod and brackets. Apply a moderate amount of pressure to the rod to ensure it does not shift or sag. If any movement is detected, re-tighten the screws or add additional support as needed. Addressing any instability issues at this stage will prevent potential problems later on.
Key Point 3: Hanging the Blackout Curtains and Addressing Light Gaps
The final step involves hanging the blackout curtains and addressing any potential light gaps that may compromise their effectiveness. Proper hanging and adjustments are crucial to achieve optimal light blockage. The following considerations are essential:
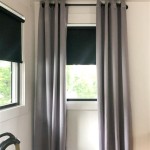
1. Hanging the Curtains: Depending on the design of the curtains, they may feature grommets, rod pockets, or hooks. Thread the curtain rod through the grommets or rod pocket, ensuring the curtains are evenly distributed along the rod. If using hooks, attach them to the back of the curtains and then hang them onto the rings or carriers on the rod. Smooth out any wrinkles or creases in the curtains to create a clean and uniform appearance.
2. Addressing Light Gaps: Light gaps can occur along the sides, top, and bottom of the curtains. To minimize these gaps, consider using blackout curtains with extra width and length. Ensure the curtains extend beyond the sides of the window frame by several inches to prevent light from seeping in. Consider adding a valance or cornice above the curtains to block light from entering at the top. Sealing the gaps along the sides of the curtains with adhesive-backed weather stripping or light-blocking tape can further enhance light blockage. Hemming the curtains to the correct length will prevent light from entering at the bottom. Some specialized blackout curtains include weighted hems to ensure a close fit against the floor.
3. Adjusting and Fine-Tuning: Once the curtains are hung, carefully adjust their position to ensure they are evenly distributed and hang properly. Check for any snags or obstructions that may prevent the curtains from closing fully. Ensure the curtains are not rubbing against the window frame or wall, as this can cause damage over time. Consider using tiebacks or holdbacks to keep the curtains open during the day and allow natural light to enter the room. Periodically check the mounting hardware to ensure it remains secure.
4. Alternative Light Blocking Solutions: In situations where complete darkness is desired, consider combining blackout curtains with other light-blocking solutions. Blackout blinds or shades can be installed behind the curtains for an additional layer of protection. Window film can be applied to the glass to reduce light transmission. These solutions can be particularly effective in rooms with excessive sunlight or in environments where complete darkness is essential.
Ultimately, the installation of easy-to-install blackout curtains is a manageable task that can significantly enhance the comfort and functionality of any space. By following these steps and taking appropriate precautions, individuals can achieve effective light control, improved privacy, and potential energy savings.
```
How To Hang Your Blackout Curtains Just A Few Simple Steps 2025 Mattress Clarity

The 4 Best Blackout Curtains Of 2025 Reviews By Wirecutter

Easy Install Blackout Curtains

How To Hang Blackout Curtains A Quick Easy Guide

Blackout Door Curtains For Privacy Easy Installed Panels Front Sidelight Curtain Tie Up Shade Indoor Black Wal Com

Sleepout 100 Blackout Curtains Install In Seconds

Grey Polyester Fabric With Grommet Top Room Darkening 102 In W X 96 L Blackout Curtains 1 Panel

Sleepout 100 Blackout Curtains Install In Seconds

Deconovo Black Short Blackout Curtains For Kitchen Grommet Thermal Insulated Room Darkening Small Window 52 X 45 Inch Set Of 2

Easy Install Blackout Curtains