Best Way To Install Curtain Rods
Installing curtain rods might seem like a straightforward task, but a proper installation ensures your curtains hang beautifully and the rods can withstand the weight of the fabric. Choosing the right hardware and following the correct steps can make a significant difference in the final result. This article outlines the best practices for installing curtain rods, providing a clear, step-by-step guide for achieving a professional and secure installation.
Choosing the Right Hardware
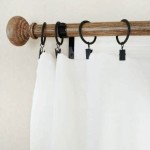
The first step towards a successful curtain rod installation lies in selecting the appropriate hardware. Consider the weight of the curtains, the width of the window, and the desired aesthetic. Heavier fabrics require sturdier rods, often made of metal or wood. Lighter fabrics can be supported by less robust materials, such as plastic or lightweight metal. The rod length should extend beyond the window frame, allowing the curtains to be fully opened without obstructing the view. Various finial styles, the decorative ends of the rod, are available to complement the overall decor.
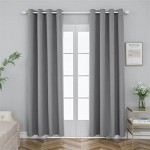
Different types of curtain rods are available, including single rods, double rods, and tension rods. Single rods are suitable for single curtain panels or sheer curtains. Double rods accommodate both sheer and heavier drapery panels. Tension rods are a convenient option for lightweight curtains and situations where drilling is not desired or feasible. Choosing the correct rod type is crucial for achieving the desired look and functionality.
Accurate Measurements and Marking
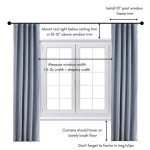
Precise measurements are essential for ensuring the curtain rod is positioned correctly. Measure the width of the window frame and add the desired extension on each side. This measurement determines the overall length of the rod. Next, decide on the height of the rod placement. Consider the ceiling height, the length of the curtains, and the desired aesthetic. Mark the bracket locations on the wall using a pencil and a level. Ensure the marks are equidistant from the center of the window and level with each other. Accurate marking is vital for achieving a symmetrical and visually appealing result.
When measuring for inside mount installations, measure the exact width of the window frame at the top, middle, and bottom. Use the smallest measurement to ensure the rod fits inside the frame. When measuring for outside mount installations, add the desired amount of overhang on each side of the window frame to determine the total rod length.
Installing the Brackets and Rod
Once the bracket locations are marked, pre-drill pilot holes at the marked points. This step is especially important for walls made of harder materials, such as plaster or concrete. Pre-drilling prevents the wall from cracking and makes inserting the screws easier. Attach the brackets to the wall using the appropriate screws and anchors, ensuring they are securely fastened. The type of anchor will depend on the wall material. Consult a hardware specialist if unsure about the correct anchor type. After the brackets are securely installed, place the curtain rod onto the brackets, ensuring it rests securely. Some rods require additional screws to secure them to the brackets. Follow the manufacturer's instructions for the specific rod being installed.
For double rods, install the back bracket first, ensuring it is flush with the wall. Then, insert the back rod followed by the front rod. Secure both rods within the bracket according to the manufacturer's instructions. Finally, attach the front bracket, ensuring it aligns with the back bracket.
Addressing Challenging Installations
Certain situations may present challenges during curtain rod installation. Bay windows, corner windows, and unusually shaped windows require specialized hardware or creative solutions. Flexible curtain tracks can be bent to follow the contours of bay windows. Corner connectors allow for seamless transitions between walls for corner windows. For unusually shaped windows, consider custom-made curtain rods or using multiple rods connected with appropriate hardware. Consulting with a professional installer can be helpful for navigating complex installations.
When dealing with particularly heavy drapes, consider using extra-strength brackets and potentially adding a center support bracket for longer rods. This will prevent the rod from bowing or sagging under the weight of the fabric.
Finally, always consult the manufacturer's instructions that accompany the specific curtain rod and hardware. These instructions provide detailed guidance tailored to the specific product, ensuring a successful and secure installation.

How To Install Curtain Rods Best Practices The Shade

How To Install Curtain Rods 5 Simple Steps

How To Install Curtain Rods Best Practices The Shade

How To Hang Curtains In 7 Steps

How To Install Curtain Rods Best Practices The Shade

How To Install Curtain Rods And Hang Curtains Youtube

A Guide To Curtain Measuring And Installation Tms Menagerie

How To Install Curtain Rods 5 Simple Steps

How To Install Curtain Rods 5 Simple Steps

How To Hang Curtains The Right Way Painting By Penny