How To Mount Curtains Without Drilling
Mounting curtains can be a daunting task for renters, homeowners who wish to avoid wall damage, or individuals looking for a quick and easy installation process. Traditionally, installing curtain rods involves drilling holes into walls, which requires tools, precision, and potentially leaves unsightly marks. However, several methods exist for mounting curtains without drilling, each offering its own advantages and limitations. Understanding these methods and their suitability for different curtain types and window sizes is crucial for a successful and damage-free installation.
The primary benefit of drill-free curtain mounting is the preservation of wall surfaces. This is especially important in rental properties, where drilling can lead to deductions from security deposits. The ease of installation is another significant advantage. Many non-drilling methods require minimal tools and can be completed in a fraction of the time compared to traditional drilling. Furthermore, these methods offer flexibility. Curtains can be easily repositioned or removed without leaving permanent damage, allowing for greater adaptability to changing needs and preferences. Choosing the right method hinges on understanding the specific needs of the window and curtain type, as well as the limitations of each no-drill solution.
Understanding Tension Rods and Their Application
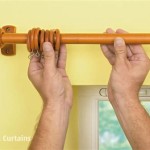
Tension rods are a popular and widely accessible method for mounting curtains without drilling. These rods utilize spring tension to stay in place within the window frame. They are particularly well-suited for lightweight curtains and sheers. The installation process is straightforward: the rod is extended slightly beyond the width of the window frame, compressed, and then inserted horizontally. The spring mechanism within the rod expands, creating pressure against the frame that holds the rod securely in place. This method is ideal for renters due to its ease of removal and lack of permanent alterations to the window frame or walls.
However, tension rods have limitations. They are primarily designed for lighter fabrics and are not suitable for heavy drapes or blackout curtains. The weight of heavier curtains can cause the rod to slip or fall. Additionally, tension rods are best used within window recesses, where the frame provides a secure surface for the rod to grip. If the window is flush with the wall, the rod may not have sufficient purchase to remain stable. The length of the rod is also a factor; very long tension rods can sag in the middle, reducing their effectiveness. Selecting a tension rod appropriately sized for the window and curtain weight is crucial for ensuring a secure and long-lasting installation.
Furthermore, the surface of the window frame plays a crucial role in the stability of the tension rod. Smooth, non-porous surfaces provide the best grip. Textured or uneven surfaces may reduce the friction between the rod and the frame, increasing the risk of slippage. Before installing a tension rod, it is recommended to clean the window frame thoroughly to remove any dust or debris that could compromise the grip. For added security, consider using rubber grips or pads on the ends of the rod. These accessories can enhance the friction and prevent the rod from sliding, particularly with heavier curtains.
When measuring for a tension rod, it's imperative to extend the rod about an inch or two beyond the actual window frame width. This provides ample space for the spring mechanism to compress and create sufficient tension. Avoid over-extending the rod, as this can weaken the spring and reduce its holding power. It's also advisable to test the rod's stability after installation by gently shaking it. If the rod feels loose or unstable, readjust it until it is securely in place. Regular checks are recommended, especially after hanging curtains, to ensure the rod remains properly positioned.
Exploring Adhesive Hooks and Their Load-Bearing Capacity
Adhesive hooks offer another alternative for mounting curtains without drilling. These hooks utilize strong adhesive backing to adhere directly to the wall or window frame. They are widely available in various sizes and weight capacities, making them versatile for different curtain types. The installation process involves cleaning the surface where the hook is to be placed, removing the protective backing from the adhesive, and pressing the hook firmly against the surface for the recommended duration, typically 30 seconds to one minute. This method is advantageous for its simplicity and affordability, and is suited for lighter curtains and valances.
One of the key considerations when using adhesive hooks is the weight capacity. Carefully assess the weight of the curtains to be hung and select hooks with a weight rating that exceeds this value. Overloading adhesive hooks can lead to failure, resulting in the curtains falling. It's always prudent to err on the side of caution and choose hooks with a higher weight capacity than strictly necessary. Furthermore, the type of adhesive used on the hooks is a critical factor. High-quality adhesives, specifically those designed for heavy-duty applications, offer superior holding power compared to generic adhesives. Look for hooks that are specifically labeled as "heavy-duty" or "high-strength" to ensure optimal performance.
The surface to which the adhesive hooks are applied is also crucial. Smooth, non-porous surfaces, such as painted drywall or glass, provide the best adhesion. Textured or porous surfaces, such as brick or concrete, may not allow the adhesive to bond effectively. Before installing adhesive hooks, it is essential to clean the surface thoroughly with rubbing alcohol to remove any dirt, grease, or residue that could interfere with the adhesive bond. Allow the alcohol to evaporate completely before applying the hooks. For added security, consider lightly sanding the surface with fine-grit sandpaper to create a slightly rougher texture, which can enhance the adhesion. However, this step should be undertaken with caution, as it can potentially damage the surface.
Proper placement of adhesive hooks is essential for ensuring the curtains hang correctly and the weight is distributed evenly. Measure carefully to determine the desired height and spacing for the hooks. Use a level to ensure the hooks are aligned horizontally. When hanging curtains with multiple hooks, it is often beneficial to space the hooks evenly to distribute the weight and prevent sagging. Allow the adhesive to cure for the recommended duration before hanging the curtains. Typically, adhesives require 24 to 72 hours to fully cure and achieve their maximum holding power. Avoid stressing the hooks during this curing period. Once the adhesive has cured, test the stability of the hooks before hanging the curtains by gently pulling on them. If a hook feels loose or unstable, remove it and apply a fresh hook in a slightly different location.
Utilizing Magnetic Curtain Rods for Metal Surfaces
Magnetic curtain rods represent a specialized but effective method for mounting curtains without drilling, particularly on metal surfaces. These rods feature strong magnets that adhere directly to metal window frames, doors, or even metal panels. They are ideal for hanging curtains in metal-framed windows, steel doors, or other metal structures where drilling is not feasible or desirable. The installation is extremely simple: the rod is positioned against the metal surface, and the magnets securely grip the metal, holding the rod in place. This method is well-suited for lightweight curtains and sheers in environments where metal surfaces are readily available.
The magnetic strength of the curtain rod is a paramount consideration. Different magnetic rods have varying degrees of magnetic pull. It is essential to select a rod with sufficient magnetic strength to support the weight of the intended curtains. Evaluate the combined weight of the curtains, including any hardware such as rings or clips, and choose a magnetic rod with a weight rating that exceeds this value. Overloading the magnetic rod can lead to slippage or detachment, causing the curtains to fall. High-quality neodymium magnets offer the strongest magnetic pull and are generally preferred for heavier curtains and more demanding applications.
The surface quality of the metal is a factor that significantly affects the performance of magnetic curtain rods. Clean, smooth, and rust-free metal surfaces provide the best adhesion. Any rust, dirt, or debris on the metal surface can reduce the magnetic contact and weaken the bond. Before installing the magnetic rod, thoroughly clean the metal surface with a degreasing cleaner and a clean cloth to remove any contaminants. Ensure the surface is completely dry before positioning the rod. For added protection against scratches and to improve the grip, consider using rubber or felt pads between the magnets and the metal surface.
When installing magnetic curtain rods, distribute the weight of the curtains evenly across the rod to prevent sagging or uneven loading. Use multiple magnetic rods for wider windows or heavier curtains to provide additional support. Position the rods strategically to ensure the curtains hang properly and the weight is balanced. Regularly inspect the magnetic rods to ensure they remain securely attached to the metal surface. Over time, the magnetic strength can weaken due to exposure to heat, moisture, or other environmental factors. If the magnets show signs of deterioration or the rod becomes loose, replace the magnetic rod with a new one to maintain a secure and reliable installation. This ensures the continued stability and proper hanging of the curtains.

5 Easy Ways To Hang Curtains Without Drilling

5 Easy Ways To Hang Curtains Without Drilling

How To Hang A Curtain Rod Without Drilling Into The Wall

How To Hang Curtains Without Drilling 2 Solutions

How To Hang Curtains Without Drilling 2 Solutions

How To Hang Curtains Without Drilling

Easy And Creative Ways To Hang Curtains Without Drilling Holes Pardewale In

5 Easy Ways To Hang Curtains Without Drilling

How To Hang Curtains Without Drilling 2 Solutions

How To Hang Curtains Without Drilling Holes Open Blinds