How To Measure For Fabric For Curtains: A Comprehensive Guide
Accurately measuring for curtain fabric is a crucial step in achieving a polished and professional window treatment. Imprecise measurements can result in curtains that are too short, too narrow, or simply do not hang correctly. This comprehensive guide outlines the essential steps and considerations for accurately determining the fabric requirements for your custom curtains.
Before beginning the measurement process, gather the necessary tools. These include a metal measuring tape (cloth tapes are prone to stretching and inaccuracy), a pencil, paper, and a step ladder if needed to reach higher areas. It is also beneficial to have an assistant, especially when measuring wide windows or complex configurations.
The first step is to decide on the desired style and placement of the curtains. This decision directly impacts the measurements required. Popular styles include pencil pleat, pinch pleat, grommet, and rod pocket curtains. The placement of the curtain rod, both its height and its extension beyond the window frame, also affects the total fabric needed. Consider these factors carefully before proceeding with the measurement process.
Determining the Curtain Rod Placement
The height and width of the curtain rod placement are vital for determining the overall appearance and functionality of the curtains. The height of the rod above the window frame influences the perceived height of the room, while the width affects the amount of light blocked and the overall fullness of the curtains.
Generally, it is recommended to mount the curtain rod 4-6 inches above the top of the window frame. This creates the illusion of a taller window and allows more light to enter the room when the curtains are open. For rooms with low ceilings, consider mounting the rod even higher, closer to the ceiling, to maximize the perceived height. However, ensure that the rod is securely anchored to the wall studs or using appropriate drywall anchors to support the weight of the curtains. If the goal is to make a small window appear bigger, placing the rod higher will give a more substantial impression of size.
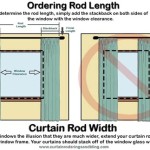
The width of the rod should extend beyond the window frame on both sides. A common recommendation is to extend the rod 8-12 inches beyond the frame on each side. This allows the curtains to be fully drawn back, exposing the entire window and maximizing the amount of natural light entering the room. It also prevents the edges of the window from being visible when the curtains are closed, providing better light control and privacy. A wider rod will require more fabric width, but the investment in material will offer a more pleasing visual result when the curtains are open.
Once the rod placement is determined, mark the locations for the rod brackets accurately. Use a level to ensure that the rod will be installed horizontally. Precise placement of the brackets is essential for the curtains to hang evenly and function smoothly.
Measuring the Curtain Length
Accurately measuring the desired curtain length is crucial for achieving the desired aesthetic and functionality. The length measurement determines where the bottom of the curtain will fall in relation to the window and the floor. Different lengths create different visual effects and serve different purposes.
There are three common curtain lengths: sill length, apron length, and floor length. Sill length curtains end just below the windowsill, providing a neat and practical option for kitchens and bathrooms. Apron length curtains fall a few inches below the windowsill, offering a slightly more formal look. Floor length curtains extend to the floor, creating a dramatic and elegant effect. This is the most common choice for living rooms and bedrooms.
To measure for sill length curtains, measure from the top of the curtain rod (or from the bottom of the rings if using rings) to the windowsill. Add an inch or two for hemming. For apron length curtains, add a few more inches to the sill length measurement. For floor length curtains, measure from the top of the rod to the floor. Subtract half an inch to an inch to allow the curtains to hang freely without dragging on the floor. Dragging curtains can collect dust and dirt, and they can also be a tripping hazard.
When measuring, consider the type of heading being used. Different heading styles require different length allowances. For example, tab top curtains require less length allowance than pencil pleat curtains. Consult the instructions for the specific heading style to determine the appropriate length allowance.
It is highly recommended to measure the length at several points across the width of the window. Floors are often uneven, and the window frame may not be perfectly level. Taking multiple measurements ensures that the curtains will hang evenly, even if there are slight variations in the floor or window frame. Use the longest measurement as the basis for calculating the total fabric length.
Calculating the Total Fabric Width
Determining the total fabric width required for curtains involves several factors, including the desired fullness, the width of the window, and the width of the fabric being used. Fullness refers to the amount of fabric used in relation to the width of the window. More fullness creates a richer, more luxurious look, while less fullness results in a flatter, more streamlined appearance.
A general guideline for fullness is to multiply the window width by a factor of 2 to 2.5. This means that for a window that is 50 inches wide, the total fabric width should be 100 to 125 inches. The exact factor will depend on the desired look and the weight of the fabric. Lighter fabrics generally require more fullness than heavier fabrics. For example, sheer curtains can be used with a 3x fullness to create a more dramatic effect. Heavier fabrics like velvet should not exceed 2.5x as they might look bulky.
When calculating the fabric width, it is important to consider the width of the fabric being used. Most fabrics come in standard widths, such as 45 inches, 54 inches, or 110 inches. If the desired fabric width exceeds the width of the fabric, multiple widths will need to be sewn together. Account for seam allowances when calculating the total fabric width. A standard seam allowance is 1/2 inch on each side, so for two widths of fabric sewn together, add one inch to the total fabric width.
Also, consider any pattern repeats in the fabric being used. If the fabric has a large pattern repeat, extra fabric may be needed to ensure that the patterns match up correctly when multiple widths are sewn together. Consult with the fabric supplier to determine the appropriate amount of extra fabric to order to account for pattern matching. Failing to properly account for pattern repeats can result in visually jarring and unprofessional curtains.
Divide the total required width by the width of the chosen fabric to determine the number of fabric widths needed. Round up to the nearest whole number. Multiply this number of widths by the desired length of the curtains (including any allowances for hems and headings) to arrive at the total amount of fabric needed. Add extra for mistakes and pattern matching; ordering a bit more is always better than coming up short.
After measuring the window width, factor in the return for the curtains. The return is the amount of fabric that wraps around the side of the curtain rod bracket to the wall. This creates a more finished look and helps to block light from the sides. Measure the distance from the front of the curtain rod to the wall, and add this measurement to the total fabric width calculation.
Calculating the total fabric requirement can seem daunting, but by breaking it down into these individual steps, it becomes a manageable process. Accurate measurements are the key to achieving professionally finished curtains that enhance the aesthetic of any room.

To Calculate The Amount Of Fabric Needed Make Curtains

How To Measure Fabric For Curtains 11 Steps With Pictures

How To Measure Fabric For Curtains 11 Steps With Pictures

How To Measure Fabric For Curtains 11 Steps With Pictures

How To Measure For Curtains Diy Projects Craft Ideas S Home Decor With

Curtain Estimator Fabric Warehouse

How To Measure Fabric For Curtains 11 Steps With Pictures

The Curtains Dept Locally Made Diy Help Center Details

The Curtains Dept Locally Made Diy Help Center Details

How To Measure Fabric For Curtains 11 Steps With Pictures