```html
How to Install Curtain Rods
Installing curtain rods is a common home improvement task that can significantly enhance the aesthetic appeal and functionality of a room. Whether replacing old hardware or adding curtains to a new space, a successful installation relies on careful planning, precise measurements, and the proper execution of each step. This article provides a comprehensive guide on installing curtain rods, ensuring a secure and visually appealing result.
Key Point 1: Preparation and Material Gathering
Prior to commencing the installation process, thorough preparation is essential. This involves gathering all the necessary tools and materials, as well as carefully planning the placement of the curtain rod. Failure to adequately prepare can lead to frustration, inaccurate measurements, and a less-than-satisfactory outcome.
The first step is to determine the type of curtain rod and mounting hardware required. Consider the weight and style of the curtains that will be hung, as this will influence the choice of rod and bracket strength. Lightweight curtains can often be supported by standard rods and brackets, while heavier draperies may necessitate more robust hardware.
Next, assemble the required tools. A basic toolkit should include a measuring tape, a pencil, a level, a stud finder, a drill with various drill bits, a screwdriver (both Phillips and flathead), and safety glasses. A ladder or step stool may also be necessary to reach the desired mounting height.
Gather all the necessary hardware components. This includes the curtain rod itself, brackets, screws, anchors (if required), and decorative finials (the end pieces of the rod). Ensure that all the components are compatible and of sufficient quality to support the weight of the curtains. Check that the screws and anchors are appropriate for the wall material (e.g., drywall, plaster, wood).
Before proceeding, inspect the wall surface where the curtain rod will be installed. Identify any potential obstructions, such as electrical wiring or plumbing. If unsure, consult a qualified professional before drilling. Use the stud finder to locate wall studs. Securing the brackets directly into studs provides the most stable and secure mounting point. If studs are not available, appropriate wall anchors must be used to provide adequate support.
Finally, measure the width of the window and determine the desired length of the curtain rod. Typically, the rod should extend several inches beyond the window frame on each side to allow for the curtains to be fully opened without obstructing the window. Consider the desired height of the curtains as well. The higher the rod is mounted, the taller the curtains will need to be to reach the floor or windowsill.
Key Point 2: Bracket Placement and Installation
The accurate placement and secure installation of the brackets are crucial for the stability and appearance of the curtain rod. Careful consideration should be given to the height and spacing of the brackets to ensure that the rod is level and the curtains hang properly.
Begin by marking the desired height for the brackets. Use the measuring tape and level to ensure that the marks are consistent on both sides of the window. A general guideline is to mount the brackets 4 to 6 inches above the window frame, but this can be adjusted based on personal preference and the desired curtain length. If mounting multiple brackets, determine the optimal spacing. For longer rods, it is recommended to use a center bracket to provide additional support and prevent sagging.
Using the stud finder, locate the wall studs near the marked bracket positions. If a stud is located behind the mark, align the bracket so that it can be directly screwed into the stud. This will provide the most secure mounting point. If no stud is available, select appropriate wall anchors that are designed for the weight of the curtains and the type of wall material.
Position the bracket against the wall at the marked location. Use a pencil to mark the screw holes on the wall. If using wall anchors, pre-drill pilot holes at the marked locations using a drill bit that is slightly smaller than the anchor. Insert the wall anchors into the pilot holes, ensuring that they are flush with the wall surface. If securing the bracket directly to a stud, pre-drilling pilot holes is also recommended to prevent the wood from splitting.
Attach the brackets to the wall using the appropriate screws. Use a screwdriver (or a drill with a screwdriver bit) to tighten the screws until the brackets are firmly secured to the wall. Avoid over-tightening the screws, as this can damage the brackets or the wall. Ensure that the brackets are level and aligned before fully tightening the screws.
After installing the brackets, double-check their stability by gently applying pressure to each bracket. If any bracket feels loose or wobbly, re-tighten the screws or replace the wall anchors with larger ones. It is essential to ensure that the brackets are securely mounted before proceeding to the next step.
Key Point 3: Rod Installation and Final Adjustments
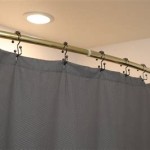
Once the brackets are securely installed, the curtain rod can be placed into the brackets and the final adjustments can be made. This involves sliding the curtains onto the rod, attaching the finials, and ensuring that the rod is level and the curtains hang properly.
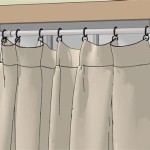
Begin by sliding the curtains onto the curtain rod. The type of curtain and the rod design will determine how the curtains are attached. Some curtains have grommets or rings that slide directly onto the rod, while others require hooks or clips. Ensure that the curtains are evenly distributed along the rod and that the seams are facing the correct direction.
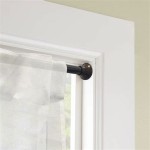
Carefully lift the curtain rod and place it into the brackets. Ensure that the rod is securely seated in the brackets and that it is properly aligned. Adjust the position of the rod as needed to ensure that it is level and centered over the window.
Attach the finials to the ends of the curtain rod. Finials are decorative end pieces that add a finishing touch to the installation. They typically screw or slide onto the ends of the rod. Tighten the finials securely to prevent them from falling off. The finials also serve to keep the curtains from sliding off the ends of the rod.
Once the rod is in place and the finials are attached, make any final adjustments to the curtains. Ensure that the curtains hang evenly and that they are the desired length. Adjust the position of the rod in the brackets if necessary to achieve the desired look. If the curtains are too long, they may need to be hemmed. If they are too short, consider lowering the position of the rod or purchasing longer curtains.
Finally, step back and admire the completed installation. Ensure that the curtain rod is level, the brackets are secure, and the curtains hang properly. Make any necessary adjustments to achieve a professional and visually appealing result.
Regularly inspect the curtain rod and brackets for any signs of wear or damage. Tighten the screws as needed to maintain the stability of the installation. With proper care and maintenance, the curtain rod should provide years of reliable service and enhance the beauty of the room.
```
How To Install Curtain Rods 5 Simple Steps

How To Install Curtain Rods Best Practices The Shade

How To Install Curtain Rods Best Practices The Shade

How To Install Curtain Rods Best Practices The Shade

How To Install Curtain Rods And Hang Curtains

How To Hang Curtains In 7 Steps

Signaturethings 2 Easy Step To Hang Curtain Rod On Drywall Like A Pro

A Guide To Curtain Measuring And Installation Tms Menagerie
Installing Curtain Rods Bestwindowtreatments Com

How To Install Curtain Rods 5 Simple Steps